DrivenKey を取得する
 1
 2
 3
 4
 5
 6
 7
 8
 9
10
11
12
13
14
15
16
17
18
19
20
21
22
23
24
25
26 | import pymel.core as pm
#DrivenKeyを取得する
#DrivenKeyは animCurveU* というノード
dKey = node.listConnections(type=("animCurveUL",
"animCurveUA",
"animCurveUT",
"animCurveUU"))
#animCurveからDriver・Drivenを取得する`
#driver
key.input.connections()[0]
#driven
key.output.connections()[0]
#DrivenKeyのKeyの数を取得(indexを取得)
num = key.numKeys()
#Driverの値を取得
driverVal = key.getUnitlessInput(index)
#Drivenの値を取得
drivenVal = key.getValue(index)
#すべてのKeyに対して処理をしたい場合は、numKeysで取得したindex数で
#ループを回してやれば良い。
for i in range(0,num):
print key.getUnitlessInput(i)
print key.getValue(i)
|
DrivenKey のノードは animCurveU* とついている4つのノード。
アクセス方法は、基本通常の Key と変わらない。
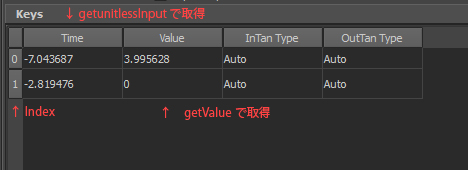
ただし、入力側が Time ではなく Value のため getTime(index) ではなく getUnitlessIntpu(indes)になる。
index は 0 スタート。

animCurve の Attribute に表示されている Keys。
左側の数字が getValue や getTime や getUnitlessInput するときの引数になる index
取得するコマンドは画像の通り。
