PythonUSD チートシート
Python を使用して USD を操作するやり方がだいぶ分かってきたので
よく使う物とかをまとめ。
全般
Import
| import os.path
from pxr import Usd, UsdGeom, Sdf, Gf
|
Stage 関係
New シーン
| stage = Usd.Stage.CreateInMemory()
|
usda を作らずにとりあえずステージを作る場合。
| stage = Usd.Stage.CreateNew(USD_PATH_ROOT + '/HelloWorld.usda')
|
usda を作って、新しいステージを作る。
USD を開く
| stage = Usd.Stage.Open(USD_PATH_ROOT + '/HelloWorld.usda')
|
すでにある USD ファイルをステージとして開く。
Payload をロードせずに USD を開く
| stage = Usd.Stage.Open(USD_PATH_ROOT + '/HelloWorld.usda',Usd.Stage.LoadNone)
|
保存する
| stage = Usd.Stage.CreateNew(USD_PATH_ROOT + '/HelloWorld.usda')
stage.Save()
|
開いている usd をそのまま保存。
| stage = Usd.Stage.CreateInMemory()
stage.GetRootLayer().Export(USD_PATH_ROOT + '/HelloWorld.usda')
|
メモリ上のみで作成している USD を Export する。
CreateNew して開いて保存する場合、すでに USD があると Error になってしまうが
こちらの場合はエラーにならない。
現在の USD の中身を確認する
| print(stage.GetRootLayer().ExportToString())
|
ExportToString をすると、げんざいの USD をプリントすることができる
全コンポ結果を反映した USD を確認する
| stage.Flatten().ExporToString()
|
通常の ExportToString()の場合、コンポ情報が残った状態で表示される。
が、すべてのコンポジションの結果をすべて判定(Flatten)した状態で見たい場合は
上のようにする。
当然のことながら、複雑なコンポを行っている場合 Flatten するとファイルサイズは増大する。
Stage 関係
ステージ内の Prim をトラバースする
| compStage = Usd.Stage.Open(USD_PATH_ROOT + "/sample.usda")
for prim in compStage.Traverse():
print(prim)
|
実行すると、このようなシーングラフなら

このように全 Prim を深さ優先で取得することができる。
Payload がロードされていないノードも Traverse する
Prim の状態をチェックしつつ検索するには GetFilteredChildren を使用する。
このコマンドの場合は、引数に Traverse するノードの状態を指定することで
該当するノードを取得することができる。
| for i in prim.GetFilteredChildren(Usd.PrimIsActive & Usd.PrimIsDefined & ~Usd.PrimIsAbstract):
print(i)
|
通常の Traverse や GetChildren は、上のフラグに+して Usd.PrimIsLoaded も ON になっている。
なので、Payload で読まれていない Prim は取得できない。
Layer をミュートする
| # Layerのusdファイルは identifer で取得できる
# パス指定でLayerをミュート(コンポ処理から除外)できる
compStage.MuteLayer(layer.identifier)
|
ミュートは現在のステージ上のみで有効で、USD ファイル内には保存されない。
→ ミュートした状態で Flatten すると、ミュート状態のレイヤーは無効化される。
Layer 関係
RootLayer を取得

| openUsd = Usd.Stage.Open(USD_PATH + "/baseUSD.usda")
print(openUsd.GetRootLayer())
|
Composition の Root の Layer(.usda)を取得する。
ここで取得出来る Sdf.Find()で取得出来る Layer の Prim は
いわゆる PrimSpec。
指定 Layer オブジェクトの usd ファイルパスを取得する
Prim 操作
Prim/Class/Over を作る
| stage.DefinePrim("/hogehoge")
stage.OverridePrim("/over")
stage.CreateClassPrim("/class")
|

スキーマなしの Prim が作成される。
Stage から Prim を取得する
| prim = stage.GetPrimAtPath('/hogehoge')
print(prim)
|
スキーマありの Prim を定義する
| stage = Usd.Stage.CreateInMemory()
# Xformを作る
xform = UsdGeom.Xform.Define(stage, '/xform')
# Cubeを作る
cube = UsdGeom.Cube.Define(stage, '/hello')
|
ConcreteSchema には Define 関数があるので、↑ のように定義する。
Schema オブジェクトから Prim を取得
SdfPath 関係
SdfPath の基本操作
| sdfPath = Sdf.Path("/base")
xform = UsdGeom.Xform.Define(stage, sdfPath)
|
SdfPath は、 / スタートで Stage 内のシーングラフを定義する。
定義した Path で、Prim やスキーマの定義を作ることができる。
各オブジェクトから Path 取得
| attr = prim.CreateAttribute("test", Sdf.ValueTypeNames.Bool)
xformPath = xform.GetPrim().GetPath()
attrPath = attr.GetPath()
|
Path を取得したい Prim や Attribute、Prim オブジェクトで .GetPath() する。
Attribute の Path は /base.test のように . で表現される。
SdfPath が何を指しているか確認する
| print(sdfPath.IsPropertyPath())
print(sdfPath.IsPrimPath())
print(sdfPath.IsTargetPath())
|
Is ~ Path で、SdfPath が何をしてしているのかチェックできる。
SdfPath 操作
| # 子に対して引数の階層を追加する
cldPath = sdfPath.AppendChild('hoge')
# 子に対してAttributeを追加する
cldAttrPath = sdfPath.AppendProperty('hogeAttr')
|
Attribute 操作
Attribute を作る/セットする
| # Boolの場合
attr = prim.CreateAttribute("test", Sdf.ValueTypeNames.Bool)
attr.Set(False)
# Colorの場合
color_attr = prim.CreateAttribute("color", Sdf.ValueTypeNames.Color3d)
color_attr.Set(Gf.Vec3d(1, 1, 1))
|
ValueTypeNames での型指定方法は こちらを参照。
Color や Vector などの型は Gf モジュールにある定義を使用してセットする。
Attribute から値を取得する
| attr = prim.GetAttribute('test')
print(attr.Get())
|
Namespace を使用する
| # Namespaceつきのアトリビュートを作る
prim.CreateAttribute("ns:testVal", Sdf.ValueTypeNames.Bool)
props = prim.GetPropertiesInNamespace('ns')
print(props)
|
プロパティ名・アトリビュート名には Namespace をつけることができる。
つけかたは Namespace:hogehoge のように : で区切れば OK。
Namespace をつけておくと、GetPropertiesInNamespace 関数を使用して
指定の Namespace のプロパティやアトリビュートを取得することができる。
Namespace や Nmaespace 無しのプロパティ名を取得
| print(attr.GetBaseName())
print(attr.GetNamespace())
print(attr.SplitName())
|
この Namespace やプロパティ名は、プロパティオブジェクトで取得することができる。
Relationship を使用する
Relationship を作成
| # RelationshipでPrimを入れる
rel = prim.CreateRelationship('test')
rel.AddTarget(relSdfPath)
rel.AddTarget(relSdfPathB)
# AttributeもRelにできる
relAttr = prim.CreateRelationship('attr_test')
relAttr.AddTarget(attr.GetPath())
|
Relationship 先を取得
GetTargets()を使用すると、接続先の SdfPath を取得できる。
SdfPath から Attribute の値を取得する
| relPrim = stage.GetObjectAtPath(attrPath.GetTargets()[0])
print(relPrim.Get())
|
SdfPath から Prim または Attribute を取得したい場合は、Stage の GetObjectAtPath()を使用する。
Object で取得したばあい、Prim の場合は Prim オブジェクトが帰ってくるし
Attribute だったら Attribute オブジェクトが帰ってくる。

Metadata は Prim や Attribute などに対して設定できる付加情報。
| # 指定のPrim・Attribute・PropertyのMetadataをDictで取得
print(prim.GetAllMetadata())
|
| newScn.SetMetadata('comment', 'Hello World')
|
CustomData を使用する
| # 指定のオブジェクトに対してCustomDataを指定する
prim.SetCustomDataByKey('userCustomMeta', 'fuga')
# 取得する
print(prim.GetCustomData())
# namespaceを指定した場合
prim.SetCustomDataByKey('test:userCustomMeta', 'fuga')
|

CustomData で Namespace をつけると、Dict 型をネストできる。
val['test']['usercustomdata']
アクセスするときはこんな感じにできる。
Transforrm 操作
| stage = Usd.Stage.CreateInMemory()
xform = UsdGeom.Xform.Define(stage, '/xform')
xform.AddTranslateOp().Set((50, 0, 0))
|
Xformable クラスに各種 Tranlsform 操作用の関数があるので
それを使用すれば Transform ができる。
| path = Sdf.Path("/xform")
prim = stage.GetPrimAtPath(path)
UsdGeom.XformCommonAPI(prim).SetRotate((90, 0, 0))
|
Xform オブジェクトではなく、Prim オブジェクトから
Transform 処理をしたい場合は XformCommonAPI を使用する。
コンポジション関係
VariantSet
1
2
3
4
5
6
7
8
9
10
11
12
13
14
15
16
17
18 | vset = prim.GetVariantSets().AddVariantSet('hogehoge')
vset.AddVariant('red')
vset.AddVariant('blue')
vset.AddVariant('green')
colorAttr = UsdGeom.Gprim.Get(newScn, '/World/Cube').GetDisplayColorAttr()
vset.SetVariantSelection('red')
with vset.GetVariantEditContext():
colorAttr.Set([(1, 0, 0)])
vset.SetVariantSelection('blue')
with vset.GetVariantEditContext():
colorAttr.Set([(0, 0, 1)])
vset.SetVariantSelection('green')
with vset.GetVariantEditContext():
colorAttr.Set([(0, 1, 0)])
|
Reference
| refPrimA = stage.DefinePrim("/World/BookGrp/Book")
refPrimA.GetReferences().AddReference(kitchenSetRoot + 'Book/Book.usd')
|
Reference で読み込みたい usd を Prim に対してセットする
Inherits
1
2
3
4
5
6
7
8
9
10
11
12
13
14
15
16 | # クラスを定義して保存する
classPrim = stage.CreateClassPrim('/TestClass')
attr = classPrim.CreateAttribute('hoge', Sdf.ValueTypeNames.Bool)
attr.Set(True)
stage.GetRootLayer().Export(USD_PATH + 'usdClass.usda')
# 定義したクラスをSubLayerでロードして、継承する
inheritStage = Usd.Stage.CreateInMemory()
rootLayer = inheritStage.GetRootLayer()
rootLayer.subLayerPaths = [USD_PATH + 'usdClass.usda']
prim = inheritStage.DefinePrim('/hoge')
path = Sdf.Path('/TestClass')
prim.GetInherits().AddInherit(path)
print(inheritStage.GetRootLayer().ExportToString())
|
継承したいクラスが別ファイルに存在する場合は
ファイルをサブレイヤーでロードして、それから継承先の Prim に対して
GetInherits().AddInherit(path)
で読み込む。
出力結果はこんな感じに。
1
2
3
4
5
6
7
8
9
10
11
12 | #usda 1.0
(
subLayers = [
@C:/pyEnv/JupyterUSD_py27/usd/usdClass.usda@
]
)
def "hoge" (
prepend inherits = </TestClass>
)
{
}
|
SubLayer
| stage = Usd.Stage.CreateInMemory()
rootLayer = stage.GetRootLayer()
rootLayer.subLayerPaths = [kitchenSetRoot + "/Book/Book.usd", kitchenSetRoot + "/Ball/Ball.usd"]
|
アニメーション関係
1
2
3
4
5
6
7
8
9
10
11
12
13
14
15 | newScn.SetStartTimeCode(0)
newScn.SetEndTimeCode(100)
# Mem上に作成したUSDファイルを色々コントロール
worldGeom = UsdGeom.Xform.Define(newScn, "/World")
cubeGeom = UsdGeom.Cube.Define(newScn, "/World/Cube")
# PrimのPath(sdfPath)の作成。
worldPath = Sdf.Path("/World")
helloPath = worldPath.AppendChild("hello")
# Cubeをアニメーション
spin = cubeGeom.AddRotateZOp(opSuffix='spin')
spin.Set(time=0, value=0)
spin.Set(time=100, value=360)
|
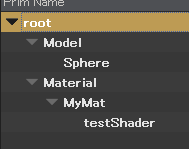
マテリアル関係
1
2
3
4
5
6
7
8
9
10
11
12
13
14
15
16
17
18
19
20 | stage = Usd.Stage.CreateInMemory()
rootLayer = stage.GetRootLayer()
sphere = UsdGeom.Sphere.Define(stage, '/test/sphere')
matPath = Sdf.Path("/Model/Material/MyMat")
mat = UsdShade.Material.Define(stage, matPath)
shader = UsdShade.Shader.Define(stage, matPath.AppendChild('testShader'))
# Shaderのアトリビュート設定
# 色をつけただけの基本のPBRシェーダーを作る
shader.CreateIdAttr('UsdPreviewSurface')
shader.CreateInput('diffuseColor', Sdf.ValueTypeNames.Color3f).Set(Gf.Vec3f(0, 1, 0))
shader.CreateInput('metalic', Sdf.ValueTypeNames.Float).Set(0.9)
shader.CreateInput('roughness', Sdf.ValueTypeNames.Float).Set(0.2)
# Shaderの結果をMatにつなげる
mat.CreateSurfaceOutput().ConnectToSource(shader, "surface")
# Bind
UsdShade.MaterialBindingAPI(sphere.GetPrim()).Bind(mat)
|
Mesh 関係
1
2
3
4
5
6
7
8
9
10
11
12 | UsdGeom.Xform.Define(stage, '/hoge')
mesh = UsdGeom.Mesh.Define(stage, '/hoge/hogehoge')
# %%
mesh.CreatePointsAttr([(-5, -5, 5), (5, -5, 5), (5, 5, 5), (-5, 5, 5)])
# 1Faceあたりの頂点数
mesh.CreateFaceVertexCountsAttr([3, 3])
# 結線情報?
mesh.CreateFaceVertexIndicesAttr([0, 1, 2, 0, 2, 3])
# BoundingBoxをセット?
mesh.CreateExtentAttr(UsdGeom.PointBased(mesh).ComputeExtent(mesh.GetPointsAttr().Get()))
|
Plugin 関係
ロードされている Plugin をリストする
| for i in Plug.Registry().GetAllPlugins():
print(i.name)
print(i.path)
print(i.resourcePath)
|