Skip to content

PySideのTableViewでDelegateを使う(1)

PySideのView関連で一番わかりにくいのが「Delegate」と呼ばれる部分になります。
ので今回は、TableViewをベースにその使い方をまとめてみます。

サンプルに使用しているUIファイルは
https://snippets.cacher.io/snippet/9110e33ece017819b0fb
こちら。
全コードは長いので、
https://snippets.cacher.io/snippet/6d1bf656edbf26752bdc
全部まとめて見たい場合はこちらを参照してください。

TableModelについて

まず、PySideでViewを扱う場合は、Viewに表示するデータのアクセスをコントロールする「Model」
とセットで扱います。

Modelについては、 QtCore.QAbstractItemModelを使用したカスタムモデルの作成 に書いてますが、
今回はその内容に+してTableModel用に拡張した内容の補足。

1
2
3
4
5
6
7
8
9
    def headerData(self, col, orientation, role):

        HEADER = ['名前', 'チェック', '進行状況']

        if orientation == QtCore.Qt.Horizontal and role == QtCore.Qt.DisplayRole:
            return HEADER[col]

        if orientation == QtCore.Qt.Vertical and role == QtCore.Qt.DisplayRole:
            return str(col + 1).zfill(3)

TableViewの場合は、列・行それぞれにHeaderが表示できます。
ので、Headerに何を表示するかは orientation を使用することで指定することができます。

flags

1
2
3
    def flags(self, index):

        return QtCore.Qt.ItemIsEditable | QtCore.Qt.ItemIsSelectable | QtCore.Qt.ItemIsEnabled

flagsでは、そのセルごとの編集フラグを指定できます。
今回はセルごとに編集できるようにしたいので Editable,Selectable,Enabled を指定しておきます。
ここを指定しなければ、編集不可状態になってしまいます。

セルの順番を変える

 1
 2
 3
 4
 5
 6
 7
 8
 9
10
11
12
13
14
15
16
17
18
19
    def upData(self, index):
        """
        引数のIndexを1つ上に移動する
        """
        row = index.row()
        if row > 0:
            buff = self.items.pop(row)
            self.items.insert(row - 1, buff)
            self.layoutChanged.emit()

    def downData(self, index):
        """
        引数のIndexを一つ下に移動する
        """
        row = index.row()
        if row < len(self.items):
            buff = self.items.pop(row)
            self.items.insert(row + 1, buff)
            self.layoutChanged.emit()

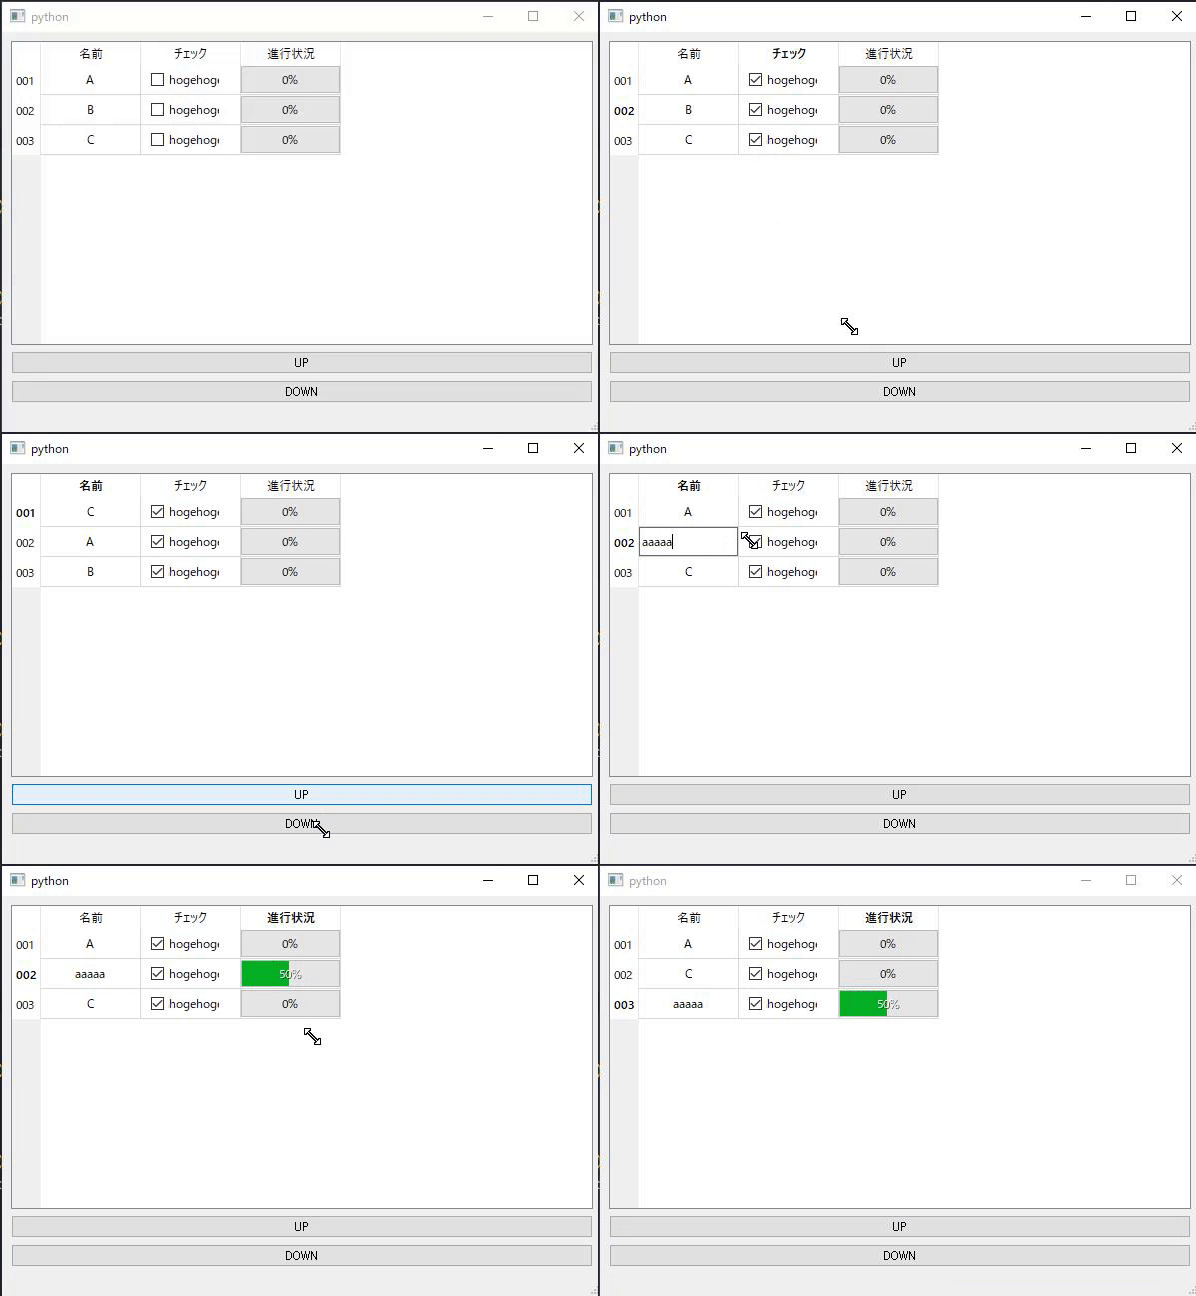
今回はボタンで行を入れ替えられるようにしたかったので、関数を2つ追加。
Modelの行はListで持っているので
配列を入れ替えれば、並び順を入れ替えられるようになります。

最後はlayoutChangedでViewを更新します。

Delegateについて

ユーザーの操作を受け付けるView、Viewに表示するためのDataをコントロースするのがModel
ではDelegateはなにかというと、
現在の処理を行うセルごとの処理を個別に処理をする部分 を受け持ちます。

Cellごとになにを行うかというと

  • セルの編集
  • セルの描画

の、大きく分けて2つになります。

セルの描画

Delegateがない場合は、Model内の data でDisplayRoleでreturn した値が描画されるだけでした。
しかし、Delegateを使用した場合はセルごとにQPainterを使用してよりカスタムした表示をおこなうことができます。

 1
 2
 3
 4
 5
 6
 7
 8
 9
10
11
12
13
14
15
16
17
18
19
20
21
22
23
24
25
26
27
28
29
30
31
32
    def paint(self, painter, option, index):
        """
        Cellの中の描画を行う
        """
        if index.column() == 0:
            painter.drawText(option.rect, QtCore.Qt.AlignCenter | QtCore.Qt.TextWordWrap, index.data())

        if index.column() == 1:
            btn = QtWidgets.QStyleOptionButton()
            btn.state |= QtWidgets.QStyle.State_Enabled
            if index.data() == True:
                btn.state |= QtWidgets.QStyle.State_On
            else:
                btn.state |= QtWidgets.QStyle.State_Off

            btn.rect = self.checkBoxRect(option)
            btn.text = "hogehoge"
            QtWidgets.QApplication.style().drawControl(QtWidgets.QStyle.CE_CheckBox, btn, painter)

        if index.column() == 2:

            bar = QtWidgets.QStyleOptionProgressBar()
            bar.rect = option.rect
            bar.rect.setHeight(option.rect.height() - 1)
            bar.rect.setTop(option.rect.top() + 1)
            bar.minimum = 0
            bar.maximum = 100
            bar.progress = int(index.data())
            bar.textVisible = True
            bar.text = str(index.data()) + '%'
            bar.textAlignment = QtCore.Qt.AlignCenter
            QtWidgets.QApplication.style().drawControl(QtWidgets.QStyle.CE_ProgressBar, bar, painter)            

描画部分は paint関数をオーバーライドすることで作成します。
TableViewの場合は、列ごとに何を表示するかを変える必要があります。

各セルに「表示したい」データというのは、Modelクラスのdata(QtCore.Qt.DataRole) で指定した方法で受け取ります。

1
index.data()

この場合 QtCore.Qt.DisplayRole で指定した値になります。
値を取得できたら、実際の描画をします。
1
painter.drawText(option.rect, QtCore.Qt.AlignCenter | QtCore.Qt.TextWordWrap, index.data())

その値を文字列として表示したい場合はQPainterのdrawText()で描画すればOKです。

セルに対してWidgetsを配置したい

drawRectなどを使用して描画することもできますが、よくあるWidgetsはデフォルトで用意されていて
それをセルの中に配置することができます。
その表示用のウィジェットが「QStyleOption####」クラスです。

サンプルでは、チェックボックスとプログレスバーを配置しています。
それ以外にもComboBoxなど、よく使うものが用意されています。

セルの編集

各セルをクリックしたときや、ダブルクリックをしたときには
そのセルの実体となっているオブジェクトの値を編集して、UIの表示をアップデートを行う必要があります。
Delegateは、そのあたりを細かくカスタマイズすることができます。

具体的には、4つのVirtual関数をオーバーライドすることで
望んだ動作を作成します。

クリックしたときに値を変更する

まずは、クリックしたときになにかする場合。
例えばセルに対してチェックボックスを表示させて、そのチェックをクリックしたら
中の値を変えるなど。

 1
 2
 3
 4
 5
 6
 7
 8
 9
10
11
12
13
    def editorEvent(self, event, model, option, index):
        """
        TableのCellに対してなにかしらのイベント(クリックした等)が発生したときに呼ばれる。
        """

        if index.column() == 1:
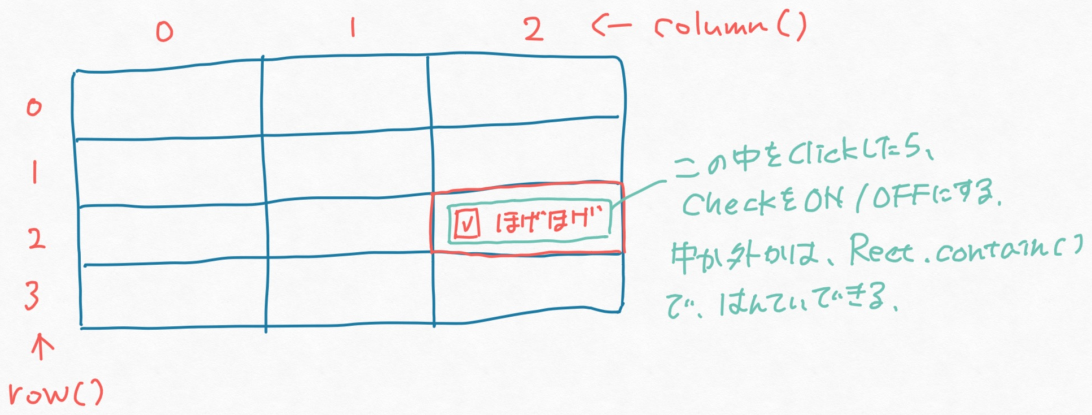
            if self.checkBoxRect(option).contains(event.pos().x(), event.pos().y()):
                if event.type() == QtCore.QEvent.MouseButtonPress:
                    currentValue = model.items[index.row()].data(index.column())
                    model.items[index.row()].setData(index.column(), not currentValue)
                    model.layoutChanged.emit()
                    return True
        return False

まず、処理は列ごとに処理を分けたいので index.column() ごとに判定を行います。
まず、チェックボックのセルの列だった場合、かつ指定の範囲内だった場合は
指定の「書き換え処理」を行えるようにします。
イベントは、今回は「マウスをクリックした」ですが、それ以外にもイベントを取得して
何かしらの処理を行う場合はこのeditorEventで処理を作成します。

特に何も指定しないと、どこでもクリックできてしまいます。
ので、「現在のセル内」でのみ判定できるように
セルの矩形を取得して、現在のマウス位置が矩形内かを判定します。

範囲内の場合は指定のモデルに値をセットして、表示をアップデートします。

ダブルクリックでWidgetsを表示して編集する

次に、ダブルクリックしたときに指定のWidgetsを配置させて
編集をする機能を付けたい場合。
その場合は、

  • createEditor
  • setEditorData
  • setModelData

この3つの関数を使用します。

createEditor

 1
 2
 3
 4
 5
 6
 7
 8
 9
10
11
12
    def createEditor(self, parent, option, index):
        """
        編集したいCellに対して、編集用のWidgetsを作成する
        """
        if index.column() == 0:
            return QtWidgets.QLineEdit(parent)

        if index.column() == 2:
            spin = QtWidgets.QSpinBox(parent)
            spin.setMinimum(0)
            spin.setMaximum(100)
            return spin

まず、ダブルクリックしたときに表示するWidgetsを、createEditorで返すようにします。
配置するWidgetsは「parent」を指定することでそのセル位置にWidgetsを配置できます。
(入れないとセル位置ではなくView全体に配置されます)

setEditor

 1
 2
 3
 4
 5
 6
 7
 8
 9
10
11
12
13
14
15
    def setEditorData(self, editor, index):
        """
        createEditorで作成したWidgetsを受け取って、
        Editorにデフォルト値を設定する。
        今回の場合、元々のCellに表示されていた内容を受け取り、
        QLineEditに対してデフォルト値をセットしている
        """

        if index.column() == 0:
            value = index.model().data(index, QtCore.Qt.DisplayRole)
            editor.setText(value)

        if index.column() == 2:
            value = index.model().data(index, QtCore.Qt.DisplayRole)
            editor.setValue(value)

createEditorで作成したWidgetsに対して、「現在の値」をセットするのが setEditorData。
いわゆるここが「編集する一歩手前」状態になります。

setModelData

 1
 2
 3
 4
 5
 6
 7
 8
 9
10
11
12
13
14
15
    def setModelData(self, editor, model, index):
        """
        編集した値を、Modelを経由して実体のオブジェクトに対してセットする
        """

        value = None

        if index.column() == 0:
            value = editor.text()

        if index.column() == 2:
            value = editor.value()

        if value is not None:
            model.items[index.row()].setData(index.column(), value)

最後にWidgetsへの編集状態が解除されたタイミングで、Widgetsの値を受け取り、
Modelに値をセットします。
このsetModelDataの editor は、createEditorで作成したWidgetsのオブジェクトになります。

こんなかんじで...

Delegateを使用することで各セルごとの挙動を細かくカスタムできるようになりました。

複数のデータを編集したりするようなUIを作る場合
FormLayoutでWidgetsを配置していくのも手ですが、
ViewとModelとDelegateを合わせてつかうことで
データ本体はModelで管理し、データの入出力や表示は列ごとにDelegateでコントロール。
そして表示はViewで行えるようになります。