PythonUSD チートシート
Python を使用して USD を操作するやり方がだいぶ分かってきたので
よく使う物とかをまとめ。
全般
Import
import os.path
from pxr import Usd, UsdGeom, Sdf, Gf
Stage 関係
New シーン
stage = Usd.Stage.CreateInMemory()
usda を作らずにとりあえずステージを作る場合。
stage = Usd.Stage.CreateNew(USD_PATH_ROOT + '/HelloWorld.usda')
usda を作って、新しいステージを作る。
USD を開く
stage = Usd.Stage.Open(USD_PATH_ROOT + '/HelloWorld.usda')
すでにある USD ファイルをステージとして開く。
Payload をロードせずに USD を開く
stage = Usd.Stage.Open(USD_PATH_ROOT + '/HelloWorld.usda',Usd.Stage.LoadNone)
保存する
stage = Usd.Stage.CreateNew(USD_PATH_ROOT + '/HelloWorld.usda')
stage.Save()
開いている usd をそのまま保存。
stage = Usd.Stage.CreateInMemory()
stage.GetRootLayer().Export(USD_PATH_ROOT + '/HelloWorld.usda')
メモリ上のみで作成している USD を Export する。
CreateNew して開いて保存する場合、すでに USD があると Error になってしまうが
こちらの場合はエラーにならない。
現在の USD の中身を確認する
print(stage.GetRootLayer().ExportToString())
ExportToString をすると、げんざいの USD をプリントすることができる
全コンポ結果を反映した USD を確認する
stage.Flatten().ExporToString()
通常の ExportToString()の場合、コンポ情報が残った状態で表示される。
が、すべてのコンポジションの結果をすべて判定(Flatten)した状態で見たい場合は
上のようにする。
当然のことながら、複雑なコンポを行っている場合 Flatten するとファイルサイズは増大する。
Stage 関係
ステージ内の Prim をトラバースする
compStage = Usd.Stage.Open(USD_PATH_ROOT + "/sample.usda")
for prim in compStage.Traverse():
    print(prim)

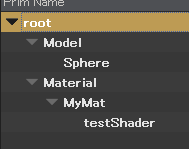
実行すると、このようなシーングラフなら

このように全 Prim を深さ優先で取得することができる。
Payload がロードされていないノードも Traverse する
Prim の状態をチェックしつつ検索するには GetFilteredChildren を使用する。 このコマンドの場合は、引数に Traverse するノードの状態を指定することで 該当するノードを取得することができる。
for i in prim.GetFilteredChildren(Usd.PrimIsActive & Usd.PrimIsDefined & ~Usd.PrimIsAbstract):
    print(i)
通常の Traverse や GetChildren は、上のフラグに+して Usd.PrimIsLoaded も ON になっている。 なので、Payload で読まれていない Prim は取得できない。
Layer をミュートする
# Layerのusdファイルは identifer で取得できる
# パス指定でLayerをミュート(コンポ処理から除外)できる
compStage.MuteLayer(layer.identifier)
ミュートは現在のステージ上のみで有効で、USD ファイル内には保存されない。
→ ミュートした状態で Flatten すると、ミュート状態のレイヤーは無効化される。
Layer 関係
RootLayer を取得

openUsd = Usd.Stage.Open(USD_PATH + "/baseUSD.usda")
print(openUsd.GetRootLayer())
Composition の Root の Layer(.usda)を取得する。
ここで取得出来る Sdf.Find()で取得出来る Layer の Prim は
いわゆる PrimSpec。
指定 Layer オブジェクトの usd ファイルパスを取得する
print(layer.identifier)
Prim 操作
Prim/Class/Over を作る
stage.DefinePrim("/hogehoge")
stage.OverridePrim("/over")
stage.CreateClassPrim("/class")

スキーマなしの Prim が作成される。
Stage から Prim を取得する
prim = stage.GetPrimAtPath('/hogehoge')
print(prim)
スキーマありの Prim を定義する
stage = Usd.Stage.CreateInMemory()
# Xformを作る
xform = UsdGeom.Xform.Define(stage, '/xform')
# Cubeを作る
cube = UsdGeom.Cube.Define(stage, '/hello')
ConcreteSchema には Define 関数があるので、↑ のように定義する。
Schema オブジェクトから Prim を取得
prim = xform.GetPrim()
SdfPath 関係
SdfPath の基本操作
sdfPath = Sdf.Path("/base")
xform = UsdGeom.Xform.Define(stage, sdfPath)
SdfPath は、 / スタートで Stage 内のシーングラフを定義する。 定義した Path で、Prim やスキーマの定義を作ることができる。
各オブジェクトから Path 取得
attr = prim.CreateAttribute("test", Sdf.ValueTypeNames.Bool)
xformPath = xform.GetPrim().GetPath()
attrPath = attr.GetPath()
Path を取得したい Prim や Attribute、Prim オブジェクトで .GetPath() する。
Attribute の Path は /base.test のように . で表現される。
SdfPath が何を指しているか確認する
print(sdfPath.IsPropertyPath())
print(sdfPath.IsPrimPath())
print(sdfPath.IsTargetPath())
Is ~ Path で、SdfPath が何をしてしているのかチェックできる。
SdfPath 操作
# 子に対して引数の階層を追加する
cldPath = sdfPath.AppendChild('hoge')
# 子に対してAttributeを追加する
cldAttrPath = sdfPath.AppendProperty('hogeAttr')
Attribute 操作
Attribute を作る/セットする
# Boolの場合
attr = prim.CreateAttribute("test", Sdf.ValueTypeNames.Bool)
attr.Set(False)
# Colorの場合
color_attr = prim.CreateAttribute("color", Sdf.ValueTypeNames.Color3d)
color_attr.Set(Gf.Vec3d(1, 1, 1))
ValueTypeNames での型指定方法は を参照。
Color や Vector などの型は Gf モジュールにある定義を使用してセットする。
Attribute から値を取得する
attr = prim.GetAttribute('test')
print(attr.Get())
Namespace を使用する
# Namespaceつきのアトリビュートを作る
prim.CreateAttribute("ns:testVal", Sdf.ValueTypeNames.Bool)
props = prim.GetPropertiesInNamespace('ns')
print(props)
プロパティ名・アトリビュート名には Namespace をつけることができる。
つけかたは Namespace:hogehoge のように : で区切れば OK。
Namespace をつけておくと、GetPropertiesInNamespace 関数を使用して
指定の Namespace のプロパティやアトリビュートを取得することができる。
Namespace や Nmaespace 無しのプロパティ名を取得
print(attr.GetBaseName())
print(attr.GetNamespace())
print(attr.SplitName())
この Namespace やプロパティ名は、プロパティオブジェクトで取得することができる。
Relationship を使用する
Relationship を作成
# RelationshipでPrimを入れる
rel = prim.CreateRelationship('test')
rel.AddTarget(relSdfPath)
rel.AddTarget(relSdfPathB)
# AttributeもRelにできる
relAttr = prim.CreateRelationship('attr_test')
relAttr.AddTarget(attr.GetPath())
Relationship 先を取得
attrPath.GetTargets()
GetTargets()を使用すると、接続先の SdfPath を取得できる。
SdfPath から Attribute の値を取得する
relPrim = stage.GetObjectAtPath(attrPath.GetTargets()[0])
print(relPrim.Get())
SdfPath から Prim または Attribute を取得したい場合は、Stage の GetObjectAtPath()を使用する。
Object で取得したばあい、Prim の場合は Prim オブジェクトが帰ってくるし
Attribute だったら Attribute オブジェクトが帰ってくる。
Metadata

Metadata は Prim や Attribute などに対して設定できる付加情報。
Metadata の取得
# 指定のPrim・Attribute・PropertyのMetadataをDictで取得
print(prim.GetAllMetadata())
Metadata に値をセットする
newScn.SetMetadata('comment', 'Hello World')
CustomData を使用する
# 指定のオブジェクトに対してCustomDataを指定する
prim.SetCustomDataByKey('userCustomMeta', 'fuga')
# 取得する
print(prim.GetCustomData())
# namespaceを指定した場合
prim.SetCustomDataByKey('test:userCustomMeta', 'fuga')
 CustomData で Namespace をつけると、Dict 型をネストできる。
val['test']['usercustomdata']
アクセスするときはこんな感じにできる。
Transforrm 操作
Xform オブジェクトを使用する場合
stage = Usd.Stage.CreateInMemory()
xform = UsdGeom.Xform.Define(stage, '/xform')
xform.AddTranslateOp().Set((50, 0, 0))
Xformable クラスに各種 Tranlsform 操作用の関数があるので
それを使用すれば Transform ができる。
Prim から Transform する場合
path = Sdf.Path("/xform")
prim = stage.GetPrimAtPath(path)
UsdGeom.XformCommonAPI(prim).SetRotate((90, 0, 0))
Xform オブジェクトではなく、Prim オブジェクトから
Transform 処理をしたい場合は XformCommonAPI を使用する。
コンポジション関係
VariantSet
vset = prim.GetVariantSets().AddVariantSet('hogehoge')
vset.AddVariant('red')
vset.AddVariant('blue')
vset.AddVariant('green')

colorAttr = UsdGeom.Gprim.Get(newScn, '/World/Cube').GetDisplayColorAttr()

vset.SetVariantSelection('red')
with vset.GetVariantEditContext():
    colorAttr.Set([(1, 0, 0)])

vset.SetVariantSelection('blue')
with vset.GetVariantEditContext():
    colorAttr.Set([(0, 0, 1)])

vset.SetVariantSelection('green')
with vset.GetVariantEditContext():
    colorAttr.Set([(0, 1, 0)])
Reference
refPrimA = stage.DefinePrim("/World/BookGrp/Book")
refPrimA.GetReferences().AddReference(kitchenSetRoot + 'Book/Book.usd')
Reference で読み込みたい usd を Prim に対してセットする
Inherits
# クラスを定義して保存する
classPrim = stage.CreateClassPrim('/TestClass')
attr = classPrim.CreateAttribute('hoge', Sdf.ValueTypeNames.Bool)
attr.Set(True)
stage.GetRootLayer().Export(USD_PATH + 'usdClass.usda')

# 定義したクラスをSubLayerでロードして、継承する
inheritStage = Usd.Stage.CreateInMemory()
rootLayer = inheritStage.GetRootLayer()
rootLayer.subLayerPaths = [USD_PATH + 'usdClass.usda']

prim = inheritStage.DefinePrim('/hoge')
path  = Sdf.Path('/TestClass')
prim.GetInherits().AddInherit(path)

print(inheritStage.GetRootLayer().ExportToString())
継承したいクラスが別ファイルに存在する場合は
ファイルをサブレイヤーでロードして、それから継承先の Prim に対して
GetInherits().AddInherit(path)
で読み込む。
出力結果はこんな感じに。
#usda 1.0
(
    subLayers = [
        @C:/pyEnv/JupyterUSD_py27/usd/usdClass.usda@
    ]
)

def "hoge" (
    prepend inherits = </TestClass>
)
{
}
SubLayer
stage = Usd.Stage.CreateInMemory()
rootLayer = stage.GetRootLayer()
rootLayer.subLayerPaths = [kitchenSetRoot + "/Book/Book.usd", kitchenSetRoot + "/Ball/Ball.usd"]
アニメーション関係
newScn.SetStartTimeCode(0)
newScn.SetEndTimeCode(100)

# Mem上に作成したUSDファイルを色々コントロール
worldGeom = UsdGeom.Xform.Define(newScn, "/World")
cubeGeom = UsdGeom.Cube.Define(newScn, "/World/Cube")

# PrimのPath(sdfPath)の作成。
worldPath = Sdf.Path("/World")
helloPath = worldPath.AppendChild("hello")

# Cubeをアニメーション
spin = cubeGeom.AddRotateZOp(opSuffix='spin')
spin.Set(time=0, value=0)
spin.Set(time=100, value=360)
マテリアル関係
stage = Usd.Stage.CreateInMemory()
rootLayer = stage.GetRootLayer()

sphere = UsdGeom.Sphere.Define(stage, '/test/sphere')

matPath = Sdf.Path("/Model/Material/MyMat")
mat = UsdShade.Material.Define(stage, matPath)
shader = UsdShade.Shader.Define(stage, matPath.AppendChild('testShader'))

# Shaderのアトリビュート設定
# 色をつけただけの基本のPBRシェーダーを作る
shader.CreateIdAttr('UsdPreviewSurface')
shader.CreateInput('diffuseColor', Sdf.ValueTypeNames.Color3f).Set(Gf.Vec3f(0, 1, 0))
shader.CreateInput('metalic', Sdf.ValueTypeNames.Float).Set(0.9)
shader.CreateInput('roughness', Sdf.ValueTypeNames.Float).Set(0.2)
# Shaderの結果をMatにつなげる
mat.CreateSurfaceOutput().ConnectToSource(shader, "surface")

# Bind
UsdShade.MaterialBindingAPI(sphere.GetPrim()).Bind(mat)
Mesh 関係
UsdGeom.Xform.Define(stage, '/hoge')
mesh = UsdGeom.Mesh.Define(stage, '/hoge/hogehoge')

# %%

mesh.CreatePointsAttr([(-5, -5, 5), (5, -5, 5), (5, 5, 5), (-5, 5, 5)])
# 1Faceあたりの頂点数
mesh.CreateFaceVertexCountsAttr([3, 3])
# 結線情報?
mesh.CreateFaceVertexIndicesAttr([0, 1, 2, 0, 2, 3])
# BoundingBoxをセット?
mesh.CreateExtentAttr(UsdGeom.PointBased(mesh).ComputeExtent(mesh.GetPointsAttr().Get()))
Plugin 関係
ロードされている Plugin をリストする
for i in Plug.Registry().GetAllPlugins():
    print(i.name)
    print(i.path)
    print(i.resourcePath)